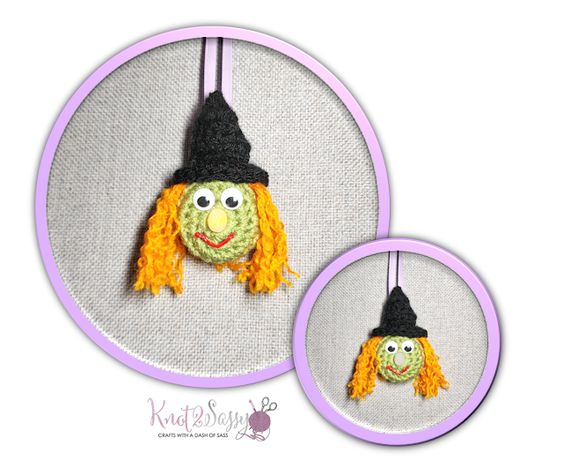
Crochet Lighted Witch Ornament
The Crochet Lighted Witch Ornament is the perfect way to add a touch of whimsy and charm to your Halloween decor this year! Hand-crafted with love and attention to detail, this adorable decoration features intricate crochet work that brings the spooky witch to life. The added touch of a light inside the ornament creates a magical glow that will instantly enhance the Halloween ambiance in your home. Whether you hang it on your front door or use it as a centerpiece on your mantel, this charming ornament is sure to delight all your guests and bring a smile to everyone's face. Get ready to enchant your space with this delightful Crochet Lighted Witch Ornament!

YARN
Scrap amounts of any worsted weight #4 yarn.Light Sage Green (A)Black (B)Orange ©
HOOK & OTHER MATERIALS
US Size G/6 (4.0mm) crochet hookBattery-operated tea light2 — 10 mm wiggle eyes (optional)3D fabric paint – redCraft glueStitch markerYarn needle
SKILL LEVEL
Easy
SIZES/FINISHED MEASUREMENTS
2 ¾” x 3 ½”
GAUGE
4 sc and 4 rows = 1”Adjust hook size if necessary to obtain gauge.
STITCH ABBREVIATIONS
ch = chain
sc = single crochet
hdc = half double crochet
dc = double crochet
BLO = Back Loop Only
NOTES
1. Similar weight yarns can be substituted, please check gauge.2. Face is worked in continuous rounds without joining.
INSTRUCTIONS
FACE
Round 1: Make magic ring, ch 1, 10 sc in ring (do NOT tighten), place marker in 1st, move up as worked, do NOT join—10 sc.
Round 2: Working in continuous rounds here and throughout, 2 sc in each around—20 sc.
Round 3: Sc in each around.
* At this point I like to place the “flame” of the candle into the center hole and adjust making sure it fits snugly then I secure and weave in the center yarn tail.
Rounds 4-7: Repeat Round 3.
Round 8 (optional): Repeat Round 3 if needed to fit tealight.
Fasten off, leaving long enough tail for sewing.
HAT
Row 1: With black chain 2, 2 sc in 2nd ch from hook, turn (2 sc)
Row 2: ch 1, 2 hdc in each st, turn (4 hdc)
Row 3: ch 1, 2 hdc in same, hdc in next 2, 2 hdc in last st, turn (6 hdc)
Row 4: ch 1, hdc in each across, turn
Row 5: ch 1, 2 sc in same, sc in next 4, 2 sc in last, turn (8 sc)
Row 6: ch 3 (counts as 1st dc), working in BLO dc in same, 2 dc in next, dc in next 4, 2 dc in last 2, finish off (12 dc)
HAIR
Cut 8 strands of orange yarn each measuring 6 inches (15 cm) long
ASSEMBLY
Attach Hat to top of Face. Bend brim and slightly curve as allowed by BLO sts. Using picture as guide, thread 4 strands of Hair for each side of Face, through sts just under brim of Hat, tie in place (brim of Hat should hide knots). Separate the plies of each strand of yarn to make the hair a little wilder looking and trimmed to desired length.
Loop a piece of yarn or ribbon through top for hanger, secure.
Insert tea light in center of magic ring, using last round yarn tail, weave tail around last round, tightening to fit snugly around base of tea light, make sure on/off button is still operational. Weave in all ends.