Crochet Lighted Mrs. Claus Ornament
The Crochet Lighted Mrs. Claus Ornament is an adorable addition to any holiday decoration collection. This charming ornament is lovingly handmade with intricate crochet detailing, giving Mrs. Claus a whimsical appearance that puts a smile on everyone's face. Its soft glow adds a warm and cozy ambiance to any room, making it a delightful centerpiece for your Christmas tree or mantelpiece. Whether you're a crochet enthusiast or simply looking to add a touch of holiday magic to your home, this enchanting Mrs. Claus ornament is sure to bring joy and cheer throughout the festive season.
YARN
Scrap amounts of any worsted weight #4 yarn.
Light Pink (A)
White (B)
Red ©
HOOK & OTHER MATERIALS
US Size G/6 (4.0mm) crochet hook
Battery-operated tea light
2 — 10 mm wiggle eyes
Decorative button (optional)
3D fabric paint — red & pink
Craft glue
Stitch marker
Yarn needle
SKILL LEVEL
Easy
STITCH GUIDE
SIZES/FINISHED MEASUREMENTS
GAUGE
4 sc and 4 rows = 1”
Adjust hook size if necessary to obtain gauge.
NOTES
1. Similar #4 weight yarns may be substituted; please check gauge.
2. Face is worked in continuous rounds without joining.
FACE
Round 2: Working in continuous rounds here and throughout, 2 sc in each around—20 sc.
Round 3: Sc in each around.
* At this point I like to place the “flame” of the candle into the center hole and adjust making sure it fits snugly then I secure and weave in the center yarn tail.
Rounds 4-7: Repeat Round 3.
Round 8 (optional): Repeat Round 3 once more if needed to fit tealight.HAT
Row 2: ch 1, turn, 2 sc in each st (4 sc),
Row 3: work in back loops only, ch 1, turn, 2 sc in each st across (8 sc), finish off ©
Row 4: turn, attach (B), ch 1, sc in 1st st and sl st in same st, work 1 sc and 1 sl st in each st across
Finish off
ASSEMBLY
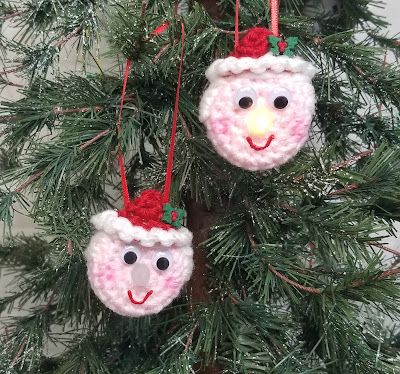
Lay the hat across the top of the face along the 4th row and sew into place. Take an 18 inch length of white yarn on the yarn needle and make 5 long stitches on each side of the face just below the hat for her hair.
Loop a piece of yarn or ribbon through top, behind the hat, for hanger, secure.
Insert tea light in center of magic ring, using the yarn tail, weave tail around last round, tightening to fit snugly around base of tea light, make sure on/off button is still operational. Weave in all ends.
Using the picture as a guide, glue on the wiggle eyes, use the pink paint to paint on cheeks and use some of the red 3D paint to make a mouth. To add a little decoration, sew or glue a button or flower to the hat.