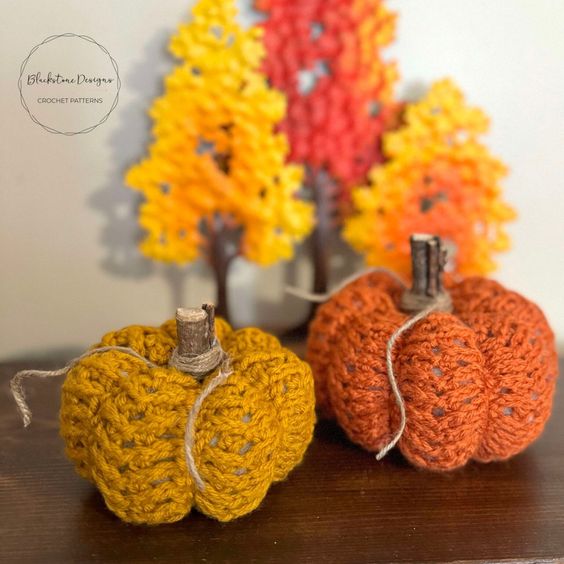
Crochet Herringbone Pumpkin
The Crochet Herringbone Pumpkin is an adorable addition to your fall decor that you can create with just a few simple steps. This cute craft project combines the classic herringbone stitch with the festive spirit of a pumpkin, making it a delightful piece to display in your home or give as a heartfelt gift to a friend. Whether you're an experienced crocheter or a beginner looking to try something new, this project is a fun and creative way to add a touch of charm to your surroundings. Get your favorite yarn in cozy autumn colors and start crocheting your very own Herringbone Pumpkin today – your home will thank you for it!
Materials
WorstedWorsted Weight Yarn (#4)
- Amount varies by size
H/8/5.00mm Hook
Fiberfill Stuffing
Yarn Needle
Scissors
Optional Materials:
Twigs
Twine
Gauge
19 herringbone sts x 20 rows = 4.5”
Not Critical for this Project
Finished Measurements
Varies by stitch and row count
Yellow: 4.5 x 3” (11.75” x 6” Strip)
Orange: 5.25 x 3.5” (12.25” x 7.5” Strip)
Stitch Guide
ch = chain
dc = double crochet
sc = single crochet
sl st(s) = slip stitch(es)
YO = yarn over
Skill Level
Intermediate
Written in U.S. Terms
Pattern Notes
- Beginning chains do not count as stitches.
- Where asterisks appear, repeat the instructions between them.
- Important: When working slip stitches in ch-1 spaces, make sure to work over the front of the fabric and not around the whole piece (which would cinch the fabric).
- “2 rows below” will always be an even number row during repeat rows. For example, from R5 you will work into R2, from R7 you will work into R4…etc.
- Each strip should be a rectangle when finished. I did the following stitches/rows for each pumpkin: Yellow = Ch 38 x 26 Rows; Orange = Ch 50 x 32 Rows.
- The stitch used has a right side and a wrong side, so you will need to make sure your herringbones are facing out.
- This stitch also creates holes in the fabric, so using darker stuffing or stuffing a nylon and adding that to the center may help hide the stuffing better.
Instructions
PUMPKIN
With Any Color,
R1. Working in the back bump of the chain across: Chain an even number, sc in 2nd chain from hook and in each ch across, turn
R2. Ch 1, sc in 1st sc, *ch 1, skip ch-1 space, sc in sc* across, turn
R3. Ch 1, sc in 1st sc, *ch 3, skip next ch-1 space and sc, sl st in next ch-1 space 2 rows
below, ch 3, skip next sc and ch-1 space, sc in next sc* across, turn
R4. Ch 1, sc in 1st sc, *ch 1, skip ch-1 space, (dc in next sc behind ch-3, ch 1, skip ch-1 space) 2X, sc in next sc* across, turn
R5. Ch 1, sc in 1st sc, *ch 3, skip next ch-1 space and dc, sl st in next ch-1 space 2 rows
below, ch 3, skip next dc and ch-1 space, sc in next sc* across, turn
R6. Ch 1, sc in 1st sc, *ch 1, skip ch-1 space, (dc in next dc, ch 1, skip ch-1 space) 2X, sc in next sc* across, turn
Repeat R5-6 until fabric measures desired height.
STEM
With Any Color,
R1. Make magic ring, ch 1, 6 sc in ring (6)
R2. 2 sc arnd (12)
R3-10. Repeat R10 to desired height
R11. FLO 2 sc in each st arnd; Fasten.
Finishing
- Fold strip in half and sew short sides together.
- Weave tail in and out of bottom, pull strings to cinch, then stitch closed.
- Flip right side out and stuff it firm (don’t overfill and stretch the stitches, because this stitch is holey as is).
- Weave tail in and out of top, pull strings to cinch, then stitch closed.
- Create sections around the pumpkin by inserting a “threaded” needle in through the bottom center of the pumpkin and out through the top center, then back in through the bottom; pull string to cinch pumpkin slightly. Repeat this 5 more times, then adjust loops to make sections even.
- Add stem to top center (of top pumpkin only if making stacked pumpkins). I made a stem from twigs and twine.
- Hide all strings.