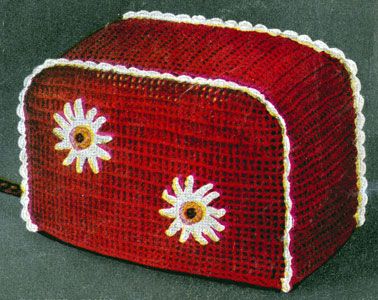
Crochet Toaster Cover
If you're looking to add a touch of charm and functionality to your kitchen, a crochet toaster cover might just be the perfect addition! Not only does it protect your toaster from dust and debris, but it also adds a lovely handmade touch to your kitchen decor. Imagine waking up to a cozy kitchen adorned with a beautiful and practical crochet toaster cover — it's like a little hug for your appliance! Plus, you can personalize it with your favorite colors and patterns, making it a unique and delightful piece that reflects your style. So, why settle for a plain and boring toaster cover when you can enjoy the warmth and character of a handmade crochet one? Treat your kitchen — and your toaster — to a touch of handmade goodness!

MATERIALS—D-M-C Pearl Cotton, Art. 116D, Size 5: 8 balls Red No. 666 (A) or any desired D-M-C Color and 1 ball Snow White (B) and D-M-C Six Strand Cotton; 1 skein Yellow No. 743 or No. 726.
1 Plastic Toaster Cover, for lining.
Steel Crochet Hook, Size 8.
GAUGE: 4 sps = 1 inch; 4 rows = 1 inch
FRONT PIECE—With A chain for length of lower edge of Front piece (having a multiple of 3 plus 8 chs). Row 1—1 dc in 8th ch from hook, * ch 2, skip next 2 chs, 1 dc in next ch; rpt from * to end. Row 2—Ch 5, turn, 1 dc in 2nd dc (making first sp over sp), * ch 2, 1 dc in next dc (sp over sp made); rpt from * to last sp, ch 2, skip next 2 chs of turning ch, 1 dc in next ch. Rpt row 2 until 1½ inches from top of Front piece. First dec. row—Ch 4, turn, 1 dc in 2nd dc, [ch 2 and 1 dc] in each dc to last sp, ch 1, skip next 2 chs of turning ch, 1 dc in next ch. 2nd dec. row—Ch 3, turn, 1 dc in 2nd dc, [ch 2 and 1 dc] in each dc to last 2 sps, ch 2, yo, draw up a loop in next dc, yo, thru 2 loops on hook, yo, skip next ch of turning ch, draw up a loop in next ch, yo, thru 2 loops on hook, yo, thru all 3 loops on hook. 3rd dec. row—Ch 4, turn, 1 dc in 2nd dc, [ch 2 and 1 dc] in each dc to last 2 sps, ch 1, 1 dc in next dc. Rpt 2nd, 3rd and 2nd dec. rows. Fasten off. BACK PIECE—Work same as for Front.
GUSSET—With A chain for length of lower edge of Gusset of Plastic Cover (having a multiple of 3 plus 8 chs) then rpt row 1 of Front. Rpt row 2 of Front until desired length. Fasten off. Block and press. Baste Gusset between Front and Back pieces. Edging—Holding Front toward you, starting at lower edge and working thru both thicknesses of Front piece and Gusset, with A work 3 sc in first sp, * 2 sc in next sp, 3 sc in next sp; rpt from * along 3 sides of Front, fasten off. From same side, with B 1 sc in first sc, skip next 2 sc, [Shell of 5 dc with ch-1 between each dc] in next sc, skip 2 sc, 1 sc in next sc; work in same way to end. Holding Back toward you work same Edging around Back. From right side, with A 3 sc in each sp around lower edge of Cover, join (in first sc), fasten off.
DAISY MOTIF—Center—With Yellow ch 5, join (with slip st) into ring. Rnd 1 (right side)—Work 12 sc in ring, join. Rnd 2—Ch 1, [1 sc and ch 1] in back loop of each sc around (thus leaving front loops of rnd 1 free), join in front loop of first sc, ch 1, [a slip st and ch 3] in front loop of each sc around, join in first slip st (leaving back loops of rnd 2 free), fasten off. From same side as last rnd, with Yellow work [a slip st and ch 3] in each free loop of rnd 1, join, fasten off. Petals—With B make a loop on hook, from wrong side, slip st in free loop of any sc of rnd 2 of Center, * ch 10, 1 sc in 2nd ch from hook, 1 sc in next ch, 1 hdc in each of 3 chs, 1 dc in each of 4 chs (Petal made), slip st in free loop of next sc on Center; rpt from * around, join (12 Petals), fasten off. With A embroider French- knots in center of Daisy Motif to make a Core as shown, front cover. Make one more Daisy Motif. Sew in place on Front piece as shown. Slip crocheted cover over plastic lining and sew to lining at lower edge.