Crochet Dummy Holder
Crochet pacifier holders are not only practical but also adorable! They offer a convenient solution to keep your little one's pacifier clean and easily accessible. The creativity that comes with crochet allows for endless customization options – from choosing colors to adding lovely embellishments like cute animals or fun shapes. These handmade pacifier holders make a thoughtful and personal gift for new parents or a charming addition to your baby's essentials. Plus, they add a touch of handmade charm to the everyday baby routine. So grab your yarn and crochet hook, and get ready to create a sweet and functional accessory that both you and your baby will love!
You will need:
- 2.00 mm crochet hook
- left over yarn of colour you like
- Scissors and sewing needle
- wooden clip
Abbreviations:
- ch – chain
- st – stitch
- sc – single crochet
- hdc – half double crochet
- dc – double crochet
- inc – 2 sc in one st (used to increase the number of stitches)
- dec – 2 sc together (used to decrease the number of stitches)
- X 6 – repeat 6 times
- at the end of every round total number of stitches is shown in brackets
Instructions:
As I mentioned before, yarn leftovers are perfect here. We basically make many small beads and rings to put on our dummy chain. Choose different sizes (also by choosing different yarn and hooks) and colours, make it interesting for your child!
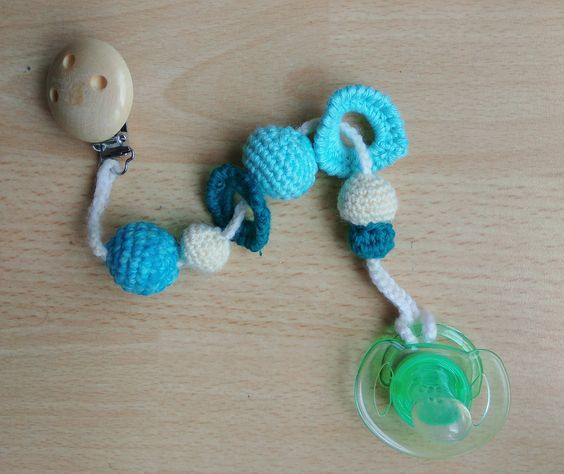
So as you can see I made 4 beads (2 small and 2 bigger ones) and 2 rings. Of course, you can make as many as you’d like. You can also decorate the dummy holder with everything you want! You should remember that a baby will put it in its mouth most of the time so you should carefully choose deco elements.
Step 1. Crochet the chain as long as you want the dummy holder to be and crochet 30 ch additionally (for the loop which actually connects dummy with the chain), don’t join the chain. Connect one end to the wooden clip.
Step 2. Beads. Make as many as you want. Note, that you should make them in the order you want to put them on the chain (starting from the wooden clips)
Round 1: 6 sc in magic ring
Round 2: inc X 6 (12)
Round 3: (sc in next st, inc) X 6 (18)
Rounds 4-6: sc in all 18 st (18)
Round 7: (sc in next st, dec) X 6 (12)
Using the hook pull the chain through the magic ring and stuff the bead. Later you can move the bead on the chain so the exact position is not very important for now.
Round 8: dec X 6 (6)
Cut the yarn leaving a tail for sewing and go with the sewing needle through the last round closing the bead.
The bead is finished! You can make it bigger/smaller using bigger/smaller hook and yarn. Or you can change the size manually:
- To make the bead bigger, crochet one more round between rounds 3 and 4:
Round 3.5: (sc in next 2 st, inc) X 6 (24)Then make 4 instead of 3 Rounds without changing. Afterwards crochet (sc in next 2 st, dec) X 6 (18) and you are at Round 7 of the description above, follow it to the end!
- To make the bead smaller, crochet first two rounds, then make 2 rounds without changing (12) and pull the chain through the magic ring. Afterwards keep following the instructions.
Step 3. Rings. You can put the rings any time in any order at any place of the chain.
Crochet 15 ch, join with sl st on the chain (at the right position).
2 ch, 28 hdc in the ring, join with sl st.
(reverse sc in next 6 st, inc) X 3, note: reverse sc is a regular sc but in the opposite direction!!!
The ring is finished! If you want to make it smaller, make the row of sc’s instead of hdc’s. If you want to make it bigger, make crochet dc instead of hdc in the row.
That’s it! Now you can combine these two shapes and play with sizes and colours!