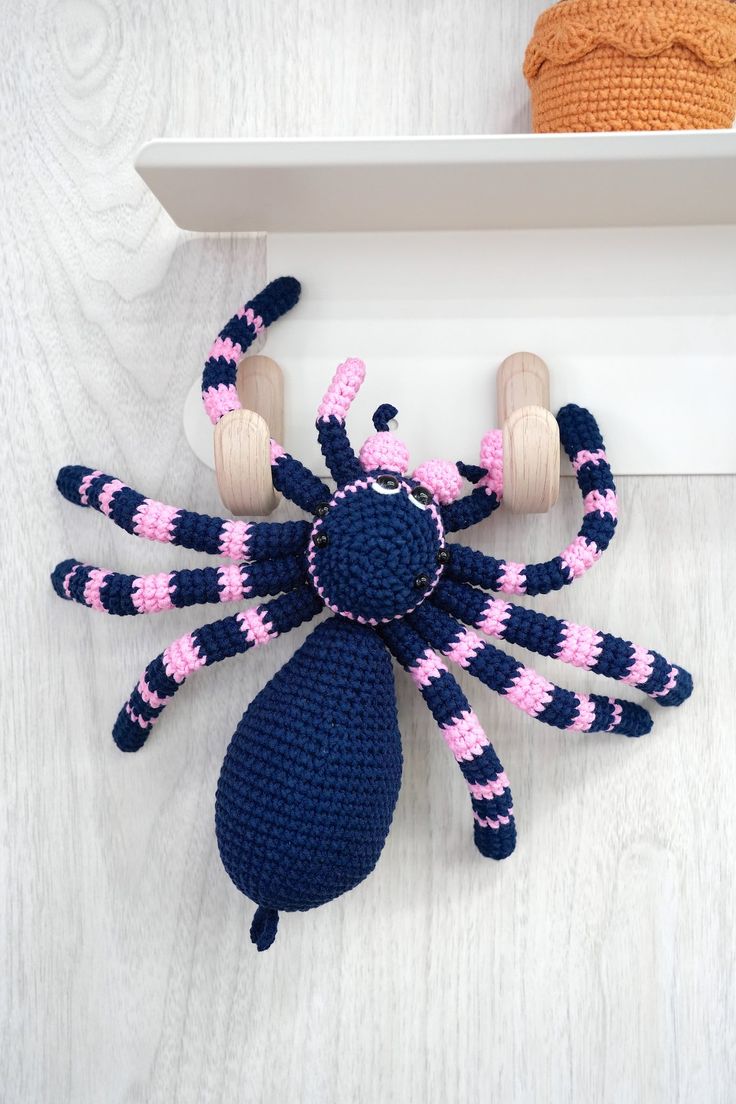
Crochet Beautiful Spider
Crocheting a beautiful spider can be a fun and creative project to shake up your crafting routine! With just a few basic crochet stitches, you can bring this adorable arachnid to life. Experiment with different yarn colors to make your spider uniquely yours, and don't forget to add some googly eyes for that extra touch of cuteness. Whether you're a crochet newbie or a seasoned pro, this little critter is sure to bring a smile to your face and charm to your crafting collection!
Materials Needed:
- Yarn – Loopara 5ply combed cotton (Pink 19, Blue 46 and White 60)
- Hook – 3.0mm
- Scissors
- Stitch Marker
- Tweezers
- Yarn Needle
- Fiber Fill
- Eyes
- Molding strips
- Position beads
- Saliva pliers
How to Crochet the Head (Make 1)
- R1: Magic ring, ch 1, 5 sc in ring, sl
- R2: ch 1, 5 sc inc, sl
- R3: ch 1, (sc, sc inc) 5 times, sl
- R4: ch 1, (sc, sc inc, sc) 5 times, sl
- R5: ch 1, (3 sc, sc inc) 5 times, sl
- R6: ch 1, (2 sc, sc inc, 2 sc) 5 times, sl
- R7: ch 1, (5 sc, sc inc) 5 times, change to pink, sl
- R8: ch 1, 35 sc, change to main color, sl
- R9: ch 1, (3 sc, sc inc, 3 sc) 5 times, sl
- R10-11: ch 1, 40 sc, sl
- R12: ch 1, (6 sc, sc2tog) 5 times, sl
- R13: ch 1, (5 sc, sc2tog) 5 times, sl
- R14: ch 1, (4 sc, sc2tog) 5 times, sl
- R15: ch 1, (3 sc, sc2tog) 5 times, sl
- R16: ch 1, (2 sc, sc2tog) 5 times, sl
How to Crochet the Abdomen (Make 1)
- R1: Magic ring, ch 1, 6 sc in ring, sl
- R2: ch 1, 6 sc inc, sl
- R3: ch 1, (sc, sc inc) 6 times, sl
- R4: ch 1, (sc, sc inc, sc) 6 times, sl
- R5: ch 1, (3 sc, sc inc) 6 times, sl
- R6: ch 1, (2 sc, sc inc, 2 sc) 6 times, sl
- R7: ch 1, (17 sc, sc inc) 2 times, sl
- R8: ch 1, (18 sc, sc inc) 2 times, sl
- R9: ch 1, 40 sc, sl
- R10: ch 1, (9 sc, sc inc) 4 times, sl
- R11: ch 1, 44 sc, sl
- R12: ch 1, (5 sc, sc inc, 5 sc) 4 times, sl
- R13-14: ch 1, 48 sc, sl
- R15: ch 1, (10 sc, sc2tog) 4 times, sl
- R16-17: ch 1, 44 sc, sl
- R18: ch 1, (9 sc, sc2tog) 4 times, sl
- R19: ch 1, 40 sc, sl
- R20: ch 1, (8 sc, sc2tog) 4 times, sl
- R21: ch 1, (7 sc, sc2tog) 4 times, sl
- R22: ch 1, (6 sc, sc2tog) 4 times, sl
- R23: ch 1, 28 sc, sl
- R24: ch 1, (5 sc, sc2tog) 4 times, sl
- R25: ch 1, (sc2tog, 10 sc) 2 times, sl
- R26: ch 1, 22 sc, sl
- R27: ch 1, (sc2tog, 9 sc) 2 times, sl
- R28: ch 1, 20 sc, sl
- R29: ch 1, (2 sc, sc2tog) 5 times, sl
- R30: ch 1, (sc, sc2tog) 5 times, sl
How to Crochet the Legs (Make 8)
- R1: Magic ring, 6 sc, sl
- R2: Ch 1, (2 sc, sc inc) 2 times, sl
- R3-R6: Ch 1, 8 sc,change to pink ,sl
- R7: Ch 1, 8 sc, change to main color, sl
- R8-R10: Ch 1, 8 sc, change to pink, s
- R11-R12: Ch 1, 8 sc, change to main color, sl
- R13-R15: Ch 1, 8 sc, change to pink, sl
- R16-R18: Ch 1, 8 sc, change to main color, sl
- R19-R22: Ch 1, 8 sc, change to pink, sl
- R23-R24: Ch 1, 8 sc, change to main color, sl
- R25-R29: Ch 1, 8 sc, sl
How to Crochet the Chelicarae (Make 2)
- R1: ch 1, 5 sc, sl
- R2: ch 1, 5 sc inc, sl
- R3-4: ch 1, 10 sc, sl
How to Crochet the Fangs (Make 2)
- Ch 4, sew onto chelicarae
How to Crochet the Pedipalps (Make 2)
- R1-R6: ch 1, 6 sc, sl
- R7-R11: ch 1, 6 sc, sl,change color
How to Crochet the Spinnerets (Make 2)
- With black yarn: ch 6, 5 sl in 2nd ch from hook
Crochet Spider Assembly
- Prepare all parts. The main body should weigh approximately 65.2 grams and be about 20 centimeters wide.
- Begin by stuffing both the head and body sections with fiberfill. Make sure to stuff firmly for good shape.
- Close up the head opening. Sew the body and head together. After joining, secure and trim threads near the seam.
- Insert the fangs into the chelicerae and secure them to the head. Then begin sewing. Repeat the same process for attaching the second fang.
- Begin attaching the pedipalps. Insert wire support, then find the correct position on the head and secure firmly.
- Next, attach the legs. Insert wire support, then find the correct position on the head and secure firmly.
- After completing one leg attachment, repeat the process for the remaining legs.
- Start attaching the spinnerets. Secure them to the body with stitches.
- Begin assembling the eyes. Sew the white parts of the eyes.
- Finally, use a small amount of glue to secure the eye pupils to the head, adjust the leg positions, and your spider assembly is complete!
Crocheting Tips:
- Maintain consistent tension throughout to ensure all pieces are the same size.
- Pull each round tight when fastening off to enhance shape definition and details.
- Use cross single crochet when possible — it creates smaller holes than regular single crochet.
- For color changes, switch colors in the unfinished stitch of the previous round for cleaner transitions and more natural color blending.
Assembly Tips:
- When attaching the legs, ensure symmetry — both sides should be evenly matched.
- When joining the head and body, align them carefully along the center line to avoid crooked stitching.
- When sewing the head, first secure a few stitches on both sides to position it correctly, then complete the remaining stitches.
- Don't rush to close the head entirely during assembly — leave an opening to pull through threads when sewing joints and attaching parts.
- Leave extra length when wrapping wire with tape — this provides more stability in the finished piece.
No comments
Write a comment