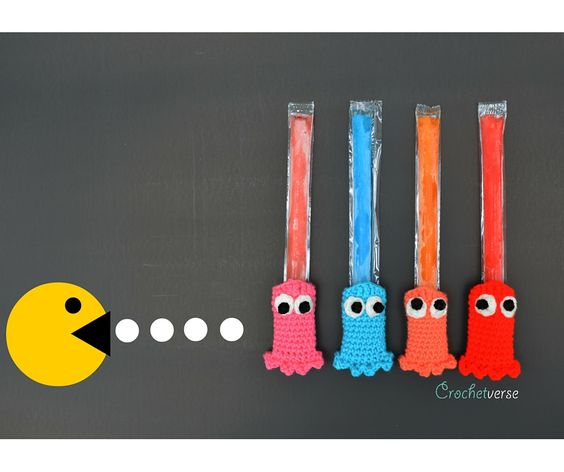
Crochet Pacman Freezie Popsicle Holder
Create your very own Pacman-inspired popsicle holder using the art of crochet! This fun and quirky project will not only keep your hands warm while enjoying a cold treat, but it will also add a touch of nostalgia to your summer snacks. By following a simple pattern and using colorful yarn, you can bring this iconic video game character to life in a unique and practical way. Whether you're a beginner or an experienced crocheter, this project is sure to bring a smile to your face every time you reach for a frozen treat. With its bright yellow color and signature Pacman shape, this popsicle holder is a playful addition to any summer gathering or picnic. Imagine the delight on your friends' faces when they see this whimsical accessory keeping their popsicles safe from melting too quickly. You can customize your holder with different facial expressions or even add a ghost or two for a complete Pacman-themed set. Crocheting this Freezie Popsicle Holder is not only a fun and creative way to spend your time, but it also makes for a practical and eye-catching accessory that will surely be a conversation starter wherever you go.
Materials:
– 25 yards worsted weight yarn for each holder in colors: red, light orange, medium pink, light aqua. I used acrylic yarn because it is what I had on hand, you can use cotton as well
– small amount white and black for the eyes
– size G (4.25mm) crochet hook
– tapestry needle
– stitch marker to mark rounds if desired
Finished Size:
About 4″ tall x 2″ wide
Skill Level: *Do not turn rounds or join unless specifically instructed, this is worked in spiral.*
Main Body:
With main body color, ch 8:
Rnd 1: sc in 2nd chain from hook and next 5 chains, 3 sc in last chain, working in the free loops on the other side of the beginning chain, sc in next 5 chains, 2 sc in last chain. (16)
Rnd 2: sc in each sc around. (16)
Rnd 3: sc in the BACK LOOP ONLY (the one furthest from you) in each sc around. (16)
Rnds 4-13: sc in each sc around. (16)
Adjustment Notes: *As you work, the position of the 1st sc of each round will move due to us working in a spiral. At the end of round 13, you should be one stitch from the edge of the holder when laid flat. If you made an error in count, just sc a few until you are in that position. If you want your holder to be taller, add rounds here, and adjust so the final sc is one away from the edge as described here as well*
Rnd 14 (partial round): sc in the next 2 sc, hdc in nxt sc, dc in nxt sc, tc in nxt sc, dc in nxt sc, hdc in nxt sc, sc in nxt 2 sc, sl st to nxt sc, tie off.
Bottom Ghost Ruffle:
With closed end of the holder facing away from you, join main body color in any remaining loop left unworked in round 3 with a sl st:
Rnd 1: ch 1, (sc, dc, sc) in same st as join, sl st in nxt remaining loop, *(sc, dc, sc) in nxt loop, sl st in nxt loop, repeat from *, SIX times more, sl st to 1st sc made, tie off. (8 ruffles made)
Note*: Because we worked in spiral, the free loop will jump up a little at the beginning/end point of round 3, do not let that confuse you, just carry on moving up a tad.
Eyes: (Make 2 of each part)
Main White:
With white, make a magic circle:
Rnd 1: ch 1, 6 sc in ring, sl st to 1st sc made, tie off. (6)
Black Pupil:
Take about ½ yard of black yarn and notice how it has 4 plys. Split the yarn so you have (2) piece of 2 plies each, then work with the 2 ply pieces. (Makes for a more proportionate looking eye)
Make a magic circle:
Rnd 1: ch 1, 3 sc in ring, do not join, instead tie the 2 tail ends together to bring into a circle shape.
Assembly:
NOTE*: Each ghost has their pupils place in a different position, just like the real deal video game!
- Using the photo as a reference, stitch the black pupil onto the white eye using the tails from the piece in the correct position. Use the tails to stitch it to appear round, you can be “artistic” in your stitching to improve the look of your final piece.
- Stitch the assembled eye onto the holder body, just below the partial round 14 that created the rounded head look.
- Weave in any remaining tails