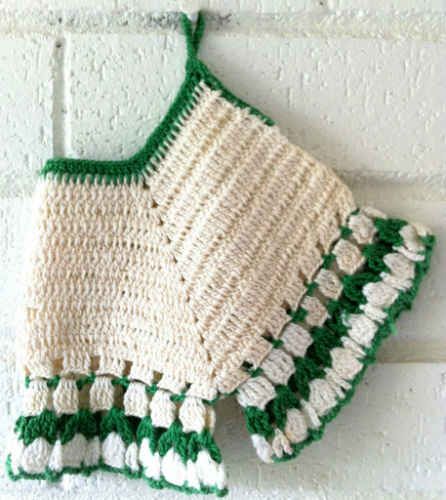
Crochet Vintage Bloomers Potholder
Create a charming and nostalgic potholder with a vintage twist by crocheting a pair of bloomers. This unique design will not only add a touch of whimsy to your kitchen decor but also provide a practical and stylish way to protect your hands from hot pots and pans. Using a combination of intricate stitches and delicate yarn, you can customize the bloomers potholder to match your personal style and color preferences. Whether you choose pastel hues for a soft and feminine look or bold shades for a more modern feel, this project is sure to be a fun and rewarding crochet experience.
Skill: Easy
Size: About 8 inches wide, 6 inches long
Materials: Number 10 Crochet Thread: White & Green; Thread needle.
Crochet Hook:Steel size 7 (1.65 mm) or size needed to obtain gauge.
Gauge: 10 sts = 1 inch, 4 rows dc = 1 inch
JOINING WITH SC
When instructed to join with sc, begin with sl knot on hook, insert hook in st or sp indicated, yo and pull up a loop, yo and draw through both loops on hook.
Bloomers
Row 1: (Right Side) Starting at waist, with White, ch 71, dc in 4th ch from hook (skipped ch count as first dc), dc in next 15 ch, ch 2, dc in next 34 ch,
ch 2, dc in next 17 ch. (68 dc)
Rows 2-5: Ch 3, turn, * (dc in next dc) across to
ch-2 sp, (2 dc, ch 2, 2 dc) in ch-2 sp, rep from * once; (dc in next dc) across to end.
(76, 84, 92, 100 dc)
At the end of Row 5, join with sl st to first dc.
Rnd 6-11: Ch 3, turn, * (dc in next dc) across to ch-2 sp, (2 dc, ch 2, 2 dc) in ch-2 sp, rep from * once;
(dc in next dc) around; join.
(108, 116, 124, 132, 140, 148 dc)
Rnd 12: Ch 3, DO NOT TURN, dc in next dc, (ch 2, skip next 2 dc, dc in next 4 dc) 5 times, * ch 2, skip next 2 dc, dc in next 3 dc, (dc, ch 2, dc) in ch-2 sp, dc in next 3 dc *, (ch 2, skip next 2 dc, dc in next 4 dc) 11 times; rep from * to * once, (ch 2, skip next 2 dc, dc in next 4 dc) 5 times, ch 2, skip next 2 dc, dc in next 2 dc; join. Finish off and weave in ends.
Legs
Rnd 1: With right side facing, flatten to align points, working through both thicknesses, join Green with sc to ch-2 sps at point, ch 4, working in single thickness around leg, (sc in next ch-2 sp, ch 4) around; join with sl st to first sc. Finish off and weave in ends.
Rnd 2: With right side facing, join White with sl st to any ch-4 sp, ch 4 (counts as first tr now and throughout), 3 tr in same sp, ch 2, (4 tr in next ch-4 sp, ch 2) around; join with sl st to first tr. Finish off and weave in ends.
Rnd 3: With right side facing, join Green with sl st to any ch-2 sp, ch 4, (tr, ch 2, 2 tr) in same space, ch 2, * (2 tr, ch 2, 2 tr) in next ch-2 sp, ch 2; rep from * around; join. Finish off and weave in ends.
Rnd 4: With right side facing, join White with sl st to ch-2 sp in middle of tr-group, ch 4, 3 tr in same sp, ch 4, sl st in next ch-2 sp, ch 4, (4 tr in next ch-2 sp, ch 4, sl st in next ch-2 sp, ch 4) around; join.
Rnd 5: With right side facing, join Green with sl st to any ch-4 sp, (ch 4, sl st in next ch-4 sp) around; join. Finish off and weave in ends.
– Repeat on other Leg.
Top Edging
Row 1: With right side facing, working in bottom of Rnd 1 between each dc, join Green with sl st between first 2 dc, ch 3, (dc between next dc) across. (66 dc) DO NOT FINISH OFF.
Hanger and Side Edging
Row 1: Ch 20, working in sides of rows over dc posts, 3 sc over ch-3 of Row 1 Top Edging, (3 sc in next row) 11 times, 30 sc over ch-20; join. Finish off and weave in ends.