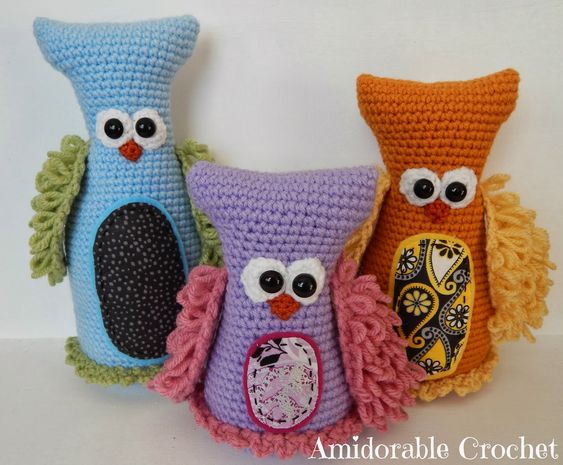
Crochet Owl
Crochet owls are absolutely adorable and delightful to create! These charming little creatures can be made with various colors and yarn textures, allowing for endless customization. Whether you're an experienced crocheter or just starting out, crafting a crochet owl can be a fun and rewarding project. Their big eyes and cute little beaks make them a favorite among handmade gifts or decorations. With a bit of patience and some basic crochet skills, you can bring these whimsical creatures to life and add a touch of coziness to your home or gifts for your loved ones. Give it a go and enjoy the soothing and creative process of making your very own crochet owl!
Supplies
2.5mm Crochet Hook (You will use this hook to create the Beak only)
3mm Crochet Hook
8mm Safety Eyes
Worsted Weight Yarn
Black Embroidery Thread
Scissors
Needle
Stuffing
Abbreviations
Ch-Chain
Sc-Single Crochet
Invdec-Invisible Decrease
Lpst-Loop Stitch
Fo-Fasten Off
St-Stitch
**Please note this pattern is for the Orange owl. If you would like to make larger or smaller owls increase or decrease rounds at the end of your owls body.
Body
Row1:You will be starting at the top of your owls head. ch x 23 (23)
Row2:Turn, sc x 22 (22), put a st marker in the last st
Row3:Sc around the entire piece to the st before your st marker x 43 (43)
Rd4-6:Sc x 44 (44)
Rd7:(Invdec x 3, sc x 16) x 2 (38)
Rd8:Invdec x 4, sc x 7, invdec x 5, sc x 13 (29)
Rd9-14:Sc x 29 (29)
Rd15:2sc in next st, sc x 14, 2sc in next st, sc x 13 (31)
Rd16-17:Sc x 31 (31)
Rd18:Sc x 2, 2sc in next st, sc x 14, 2sc in next st, sc x 13 (33)
Rd19-20:Sc x 33 (33)
Rd21:Sc x 2, 2sc in next st x 2, sc x 15, 2sc in next st x 2, sc x 12 (37)
Rd22-23:Sc x 37 (37)
Rd24:Sc x 3, 2sc in next st x 4, sc x 16, 2sc in next st x 4, sc x 10 (45)
Rd25-27:Sc x 45 (45)
Rd28:Sc x 8, 2sc in next st x 2, sc x 20, 2sc in next st x 2, sc x 13 (49)
Rd29-40:Sc x 49 (49), fo at the end of Rd40
Bottom Of Owl
Rd1:7sc in magic ring (Or ch2, 7sc in second ch from hook) (7)
Rd2:2sc in next st x 7 (14)
Rd3:2sc in next st x 14 (28)
Rd4:Sc x 28 (28)
Rd5:(Sc x 4, 2sc in next st) x 5, sc x 3 (33)
Rd6:Sc x 3, (Sc x 5, 2sc in next st) x 5 (38)
Rd7:(Sc x 4, 2sc in next st) x 7, sc x 3 (45)
Rd8:(Sc x 9, 2sc in next st) x 4, sc x 5 (49), fo
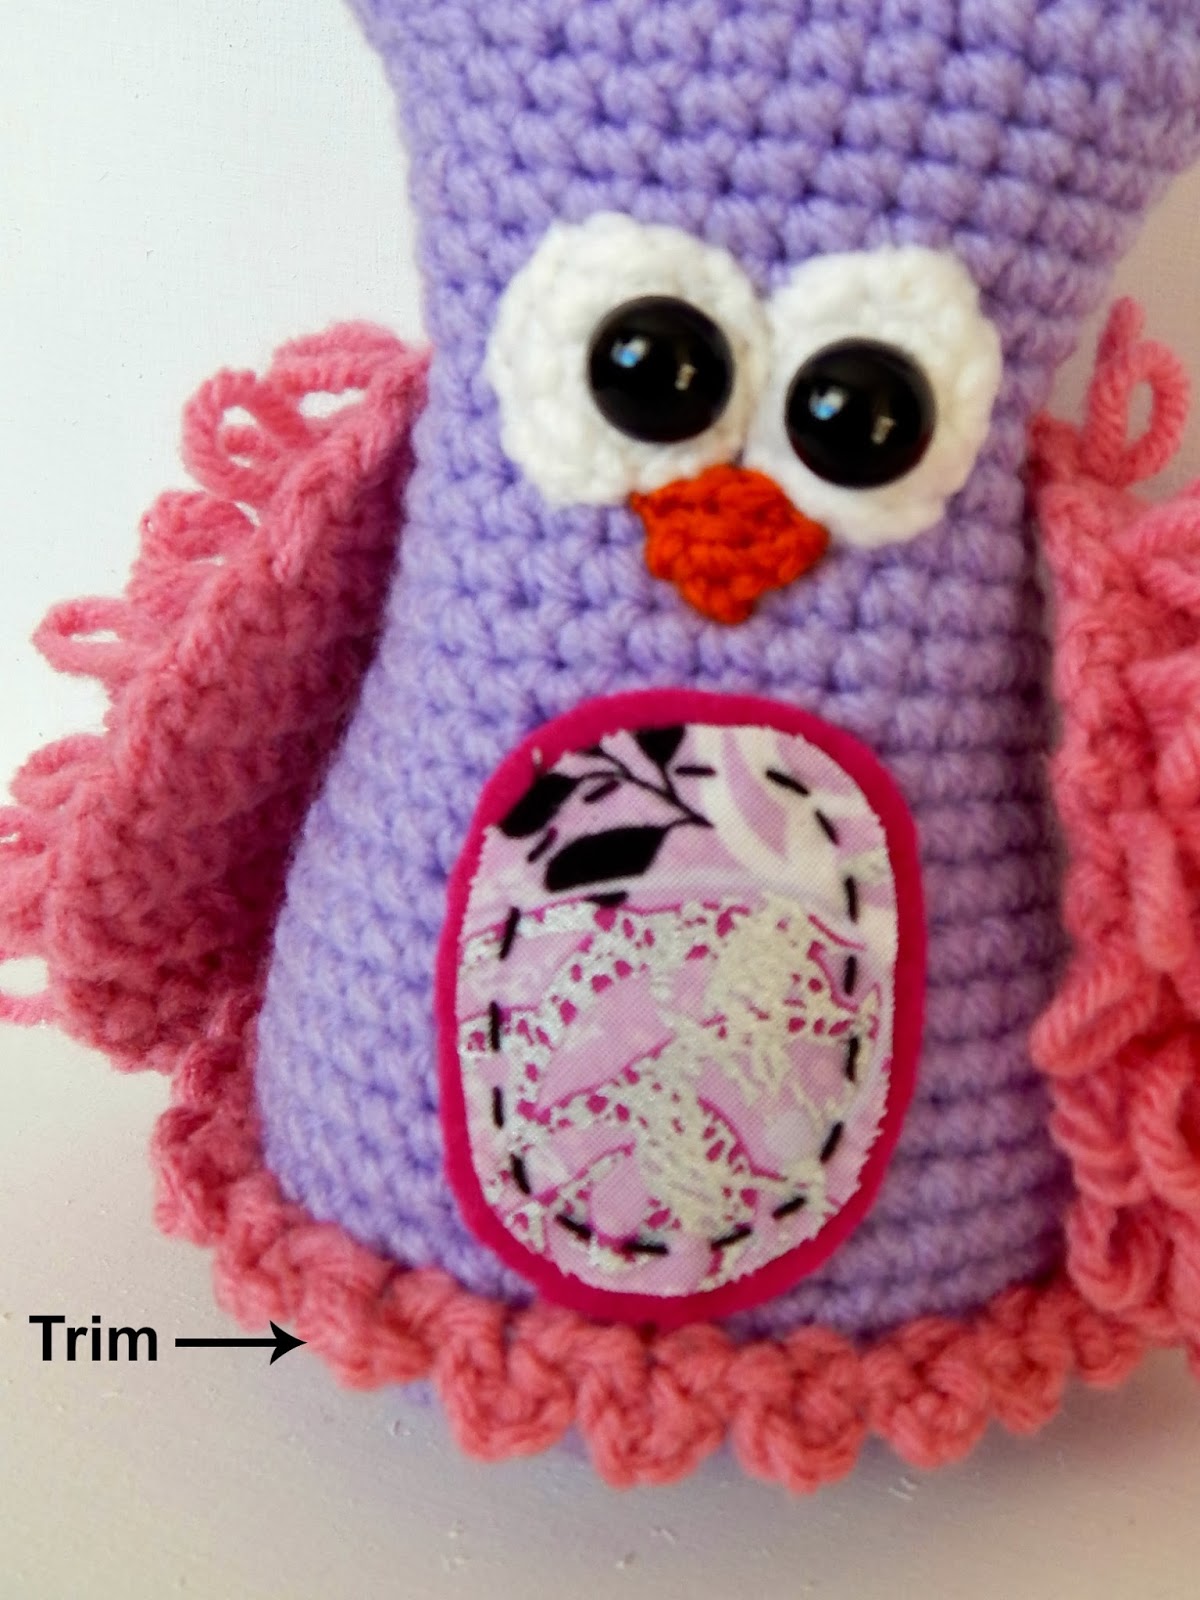
Eye Patch (Make 2)
Rd1:6sc in magic ring (Or ch2, 6sc in second ch from hook) (6)
Rd2:2sc in next st x 6 (12), fo
Wing (Make 2)
Row1:Ch2 (2)
Row2:Turn, 2sc in second ch from hook (2)
Row3:Turn, ch, 2sc in next st x 2 (4)
Row4:Turn, ch, lpst x 4 (4)
Row5:Turn, ch, sc x 4 (4)
Row6:Turn, ch, 2lpst in next st, lpst x 2, 2lpst in next st (6)
Row7:Turn, ch, sc x 6 (6)
Row8:Turn, ch, 2lpst in next st x 2, lpst x 2, 2lpst in next st x 2 (10)
Row9:Turn, ch, sc x 10 (10)
Row10:Turn, ch, lpst x 10 (10)
Row11:Turn, ch, sc x 10 (!0)
Row12:Turn, ch, lpst x 10 (10)
Row13:Turn, ch, sc x 10 (10)
Row14:Turn, ch, lpst x 10 (10)
Row15:Turn, ch, sc x 10 (10)
Row16:Turn, ch, lpst x 10 (10)
Row17:Turn, ch, invdec, sc x 6, invdec (8)
Row18:Turn, ch, lpst x 8 (8)
Row19:Turn, ch, invdec, sc x 4, invdec (6)
Row20:Turn, ch, lpst x 6 (6)
Row21:Turn, ch, invdec, sc x 2, invdec (4)
Row22:Turn, ch, lpst x 4 (4)
Row23:Turn, ch, invdec x 2 (2)
Row24:Turn, ch, lpst x 2 (2), fo (This is the top of your wing)
Beak
Row1:Use a 2.5mm hook to create your Beak. Ch2 (2)
Row2:Turn, 2sc in second ch from hook (4), fo
Trim Around The Bottom Of The Owl
Insert your hook into one of the front stitches of Rd32 of the body (The last Rd of the body), pull up loop and ch4, sc in same st. Then repeat this sequence around the entire base of the owl in the front loops only (Skip st, slst ch4 sc all in next st). Then fo.
Assembly
Now stuff your owl firmly. Sew on the bottom of your owl, sew it to the inside stitches of the last round of the body (Rd32). Sew on your wings. Add your safety eyes onto your eye patches. Sew your eye patches onto your owl. Sew on your beak. Then I cut little circles of fabric and felt and added them onto the owls belly.