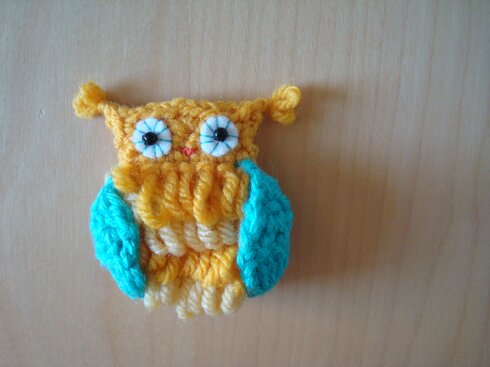
Crochet Beautiful Owl
Crocheting a beautiful owl can be such a delightful and rewarding experience! The intricate patterns and details come together to create a charming creature that is sure to bring a smile to anyone's face. Whether you're a beginner or a seasoned crocheter, this project offers the perfect balance of challenge and fun. With each stitch, you can see your owl slowly take shape, adding a touch of whimsy to your home decor or making a lovely handmade gift for someone special. Get ready to embark on a creative journey filled with soft yarns, colorful hooks, and endless possibilities as you bring your very own crochet owl to life!

I used:
Worsted weight yarn in 2 shades of yellow and blue
3.5 mm hook
Needles for sewing and embroidering
Blue and orange thread for embroidering beak and eyes
A bit of white felt for eyes
Two black round beads for eyes and black thread for sewing on eyes
Body front:
Notes: it’s worked from top to bottom to accommodate the direction of the loops, then reattach yarn to crochet the head. For the 2 different shades in the body, MC is main colour and CC is contrasting colour. Carry the colour that is not in use up the rows when switching colours.
With MC, ch 8
Row 1: sc in 2nd ch from hook, sc in each ch across, turn.
Row 2: ch 1 (turning ch 1 does not count as a st), lp st (loop stitch) in each sc across, turn.
Row 3: change to CC, ch 1, 2 sc in first st, sc in each st across until second last st, 2 sc in last sc, turn.
Row 4: ch 1, lp st in each sc across, turn.
Row 5: change to MC, ch 1, 1 sc in each st across, turn.
Row 6: ch 1, lp st in each sc across, turn.
Row 7: change to CC, ch 1, 2 sc tog over first 2 st, 1 sc in each st across until last 2 st, 2 sc tog over next 2 st, turn.
Row 8: ch 1, lp st in each sc across, turn.
Row 9: change to MC, ch 1, 2 sc tog over first 2 sc, 1 sc in each st across until last 2 st, 2 sc tog over next 2 sc, turn.
Row 10: ch 1, 1 sc in each sc across, fasten off.
Now we make the head.
With MC and wrong side facing you, attach yarn to the first row of body.
Row 1: ch 1, 1 sc in each st across, turn.
Row 2: ch 2, sl st in 2nd ch from hook, 1 sc in each of the next 3 sc across, 3 sc in next sc, 1 sc in each of the next 3 sc across, ch 2, sl st in 2nd ch from hook, sl st in the bottom of last sc just made (i.e. in the first sc of previous row), fasten off.
Back:
Note: back is worked from bottom to top in one piece and with MC only.
ch 7
Row 1: ch 1, 1 sc in each ch across, turn.
Row 2: ch 1, 2 sc in first sc, 1 sc in each sc across until second last sc, 2 sc in last sc, turn.
Row 3: ch 1, 1 sc in each sc across, turn.
Row 4: Repeat row 2.
Row 5–7: Repeat row 3 (i.e. work even).
Row 8: ch 1, 2 sc tog over first 2 sc, 1 sc in each sc across until last 2 sc, 2 sc tog over last 2 sc, turn.
Row 9: ch 1, 1 sc in each sc across, turn.
Row 10: work even.
Row 11–12: Repeat rows 1–2 of head. Fasten off, leave long tail for sewing.
Wings (make 2):
Leave 3–4 inches of tail for sewing, ch 4
Row 1: 2 dc in 4th ch from hook, turn.
Row 2: ch 3 (turning ch 3 counts as a stitch), 2 dc in next dc, dc in top of beginning ch 3, turn.
Row 3: ch 3, 3 dc tog over next 2 dc and top of turning ch 3. Fasten off, leave 3–4″ of tail for sewing.
Assembly:
Cut 2 circles for eyes. I cut mine about 1/2″ wide, but you can make them smaller or larger if you like. Owl plushes with giant eyes are very cool-looking too.
Sew eyes on the head of owl with blue embroider thread, if you like that look.
Embroider beak.
Sew on black beads to complete eyes.
Sew front and back together. I made two small loops at each ear while sewing but that’s optional. If you’re making an ornament you may also want to make a loop with a ribbon and sandwich it between the front and back and sew it all together.
Attach the wings by tying the yarn tail at the top of wings to the top corners of the first row of loop stitch, and the bottom of the wing to the bottom corners of the last row of body. This sounds more complicated than it is — you will easily get it by looking at the picture :)
And we’re done!