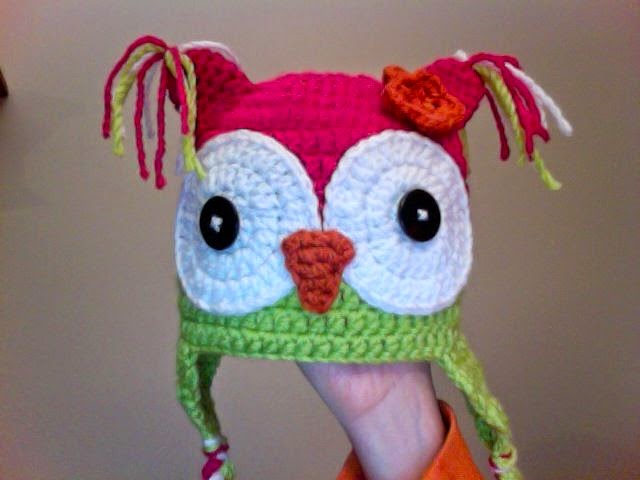
Crochet Owl Hat
Crochet owl hats are not just a fun and whimsical accessory, but also a cozy way to stay warm during colder months. The intricate detailing of the owl eyes, beak, and feathers adds a touch of charm to any outfit, making it perfect for both adults and children alike. Whether you're looking to stand out at a winter festival or simply want to add a playful twist to your winter wardrobe, a crochet owl hat is a versatile and cheerful option. Plus, the handmade nature of these hats gives them a unique and personal touch, making them great gifts for loved ones. So why not embrace your inner owl and add a bit of fun and warmth to your winter ensemble with a crochet owl hat?

I used Bernat Softee chunky yarn in hot pink, grass, pumpkin and white.
I also used an H/8 — 5.00 mm hook, and 2 black buttons, and a needle for sewing all the peices on.
This hat will fit a 12 — 18 month old baby.
So here it goes:
HAT
using pink
1) starting with a magic ring ch2. dc 11 stitches in round and join to top of ch 2. pull magic ring closed.
2) 2 dc in each st around. join (24 dc)
3) {2 dc in first st, 1 dc in next st} repeat all the way around, join. (36 dc)
4) {2 dc in first st, dc in next 2 sts.} Repeat all the way around. Join. (48 dc)
5) {2dc in first st, dc in next 3 sts.} Repeat all the way around. Join (60st)
6) no more increasing on this round. ch2, dc in next st. dc in every st around join to top of ch 2. (60 sts)
7-14) ch 2. dc in next st. dc in every st around. join to top. change to green yarn for rows 10-14 (4 rows) fasten off after round 14. weave in end of yarn.
ADDING EARFLAPS
1) From fastening off point count 9 sts. join yarn. ch 2, dc in same st as ch 2. dc over next 9 st. (11 dc, as ch 2 counts as dc) ch2 turn
2) dc2tog dc over next 7 st. dc2tog. (9 sts)
3) dc2tog over next 2 sts. dc over next 5 st. dc2tog. (7st)
4) Dc2tog over next 2 sts. dc over next 3 st. dc2tog. (5 sts)
5) dc2tog over next 2 st. dc. dc2 tog over next 2 st. (3 sts) fasten off.
for second earflap, count 9 sts in the opposite direction from fastening off point on hat and repeat.
EYES
make2
Using white
1) starting with a magic ring ch2. dc 11 stitches in round and join to top of ch 2. pull magic ring closed.
2) 2 dc in each st around. join (24 dc)
3) {2 dc in first st, 1 dc in next st} repeat all the way around, join. (36 dc)
4) fasten off leaving long tail for sewing on eyes.
VARIATION OF THE EYES:
If you would like to do the variation shown in some of the other pictures, complete row 1 using black yarn. When doing row 2 change to desired color and do 2 SC in each stitch around. (still a total of 24 stitches.) Do row 3 as stated above using white yarn. You will now have an eye with a large pupil, and colored «iris». (row 1 with DC, row 2 with sc and row 3 with DC.) Make sure to leave a long tail for sewing on.
PLEASE!!! MAKE SURE THE BUTTONS ARE SEWN ON WELL SO WE HAVE NO CHOKING BABIES!!
EARS
make 2
1) start with magic ring and sc 5. do not join place marker if needed
2)2sc in each st around (10st.) move marker.
3-5) continue 3 more rows of 10sc each fasten off, leaving long tail for sewing. attach onto hat.
cut 2 lengths of each color 6 " long. tie in the middle using main color and sew on the tops of ears.
BEAK
make 1
using orange
1) ch 6. turn
2) sc in second ch from hook.
3)hdc in next st
4)dc in next st
5) tr in next st.
6) dtr in next st. fasten off leaving long tail for sewing.
cut 2 lengths of pink, green and white each approx 18" long. fold in half and loop through bottom of earflap. sort colors and braid, fastening off with a knot at the bottom. Trim ends to be even.