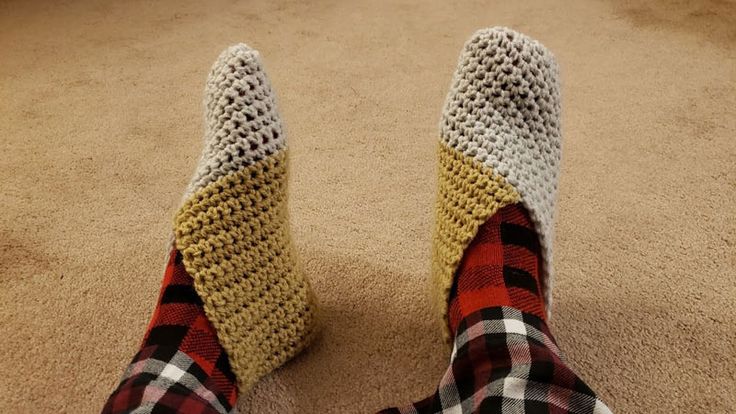
Crochet Snuggly Slipper Socks
Keep your feet cozy and stylish with our Crochet Snuggly Slipper Socks! Perfect for lounging around the house or snuggling up by the fireplace, these socks are handmade with love to keep your toes warm all winter long. With a variety of colors and patterns to choose from, you can mix and match to fit your unique style. Treat yourself or a loved one to these adorable slipper socks — your feet will thank you!
Materials Needed & Measurements:
- Yarn: Lion Brand Wool-Ease Thick & Quick (Weight: 6, Super Bulky); 3 skeins (1 Color A, 2 Color B).
- Hooks: K (6.5mm) & L (8.0mm).
- Optional: Leather for soles, leather punch, fishing line.
Measurements:
- Sizes: Narrow (7¼”), Average (9½”), Wide (11¼”) ankle circumference.
- Gauge: 11 sc x 11.75 rows = 4”.
Abbreviations Used:
- ch: chain
- sc: single crochet
- hdc: half double crochet
- sl st: slip stitch
- st(s): stitch(es)
- rep: repeat
- BLO: back loop only
- sc2tog: single crochet two stitches together (decrease)
- hdc2tog: half double crochet two stitches together (decrease)
Stitching Instructions for Making the Snuggly Crochet Slipper Socks Pattern:
Step 1: Sole
- Ch the required number of stitches based on size:
- Narrow: 11 ch
- Average: 14 ch
- Wide: 16 ch
- Row 1: Sc in the 2nd ch from hook and in each ch across. (10, 13, or 15 sc depending on size). Turn.
- Rows 2-6: Ch 1, sc across all sts. Turn after each row.
- Adjust the number of rows to match foot length (approx. 6-8 rows for smaller sizes, 8-10 for larger).
- Tip: Ensure the sole lies flat and measures the desired length for the foot size.
Step 2: Upper Foot
- Attach Color A yarn to the sole edge.
- Row 1: Ch 2 (does not count as a stitch), hdc evenly across the top edge of the sole. Turn.
- Place 1 hdc in each st along the edge, ensuring stitches are evenly spaced.
- Rows 2-4: Ch 2, hdc in BLO across. Turn.
- Note: The BLO technique creates a stretchy ribbing effect, perfect for comfort.
- Optional: For a snugger fit, hdc2tog once at each end in Row 4 to slightly taper the foot section.
Step 3: Heel
- With Color B, begin shaping the heel:
- Row 1: Ch 1, sc2tog at the beginning and end of the row, sc in each st between. Turn.
- This decreases 2 sts per row, gradually narrowing the heel section.
- Rows 2-5: Rep Row 1 until 4-6 sts remain. Turn.
- Adjust the number of rows based on the size:
- Narrow: 4 rows
- Average: 5 rows
- Wide: 6 rows
- Adjust the number of rows based on the size:
- Tip: Test fit the sock at this stage to ensure the heel curves comfortably around the foot.
Step 4: Cuff
- Attach Color A yarn around the ankle opening.
- Round 1: Ch 2, hdc evenly around the ankle opening. Sl st to join.
- Place approximately 2 hdc sts per row edge along the upper foot and heel.
- Rounds 2-5: Ch 2, hdc in BLO around. Sl st to join after each round.
- The BLO technique provides a ribbed cuff that stays snug around the ankle.
- Adjust the number of rounds to match your desired cuff height.
Step 5: Finishing Touches
- Weave in all loose ends securely.
- If adding a leather sole, punch holes around the edges of the leather. Use fishing line or yarn to attach it to the sole with whipstitches for durability.
Repeat the process to create the second sock.
Now you have cozy, handmade crochet slipper socks ready to wear!
No comments
Write a comment